
How To Make the Leap To All Grain Brewing:
(everything you need to get started)
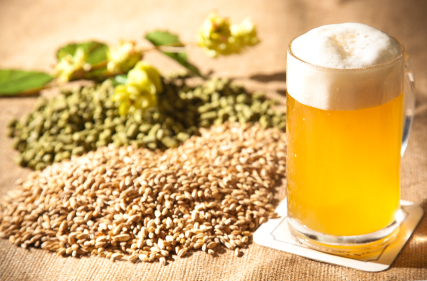
At some point most every extract brewer considers making the leap to all grain. And why not? It’s cheaper, gives you more control over the end product and provides you with a real sense of having made something truly from scratch. Did I mention no more sticky arms from adding DME to your kettle??
It can be a scary transition for some, however. There is a lot of new equipment and science that needs to be learned… or is there? I thought about it for several months before finally just diving in. What I found was the processes and equipment needed really weren’t all that different.
Some of the Science & It’s Practical Application:
Below is a list of terms you’ve no doubt heard in your homebrewing studies.
Grist – Another word for grain bill.
Mash Tun – A vessel used for mashing (synonymous with “steeping”) grains. In homebrewing, this vessel is often a converted cooler.
Mash - The process in which grains are steeped for a period of time at a specific temperature and a specific ratio of water to pounds of grain. The temperature and ratio of water activate enzymes in your base malt (often 2-row) which break down the complex carbohydrates in the grains to fermentable sugars. You can think of this process as turning your grains into your extract.
The generally accepted ratio of water to grains is 1-2 quarts of water per pound of grain. The temperature range is 140F – 168F, lower temps = dryer beer while higher temps caramelize more of the sugars resulting in a sweeter end product (either end of the range would be considered extreme… rarely will you mash below 148 or above 160). Typical mash times range from 60-90 minutes.
Hot Liquor Tank (HLT) – Simply a vessel used to contain and/or heat water (called liquor in this case… because why not take something simple and make it more confusing?).
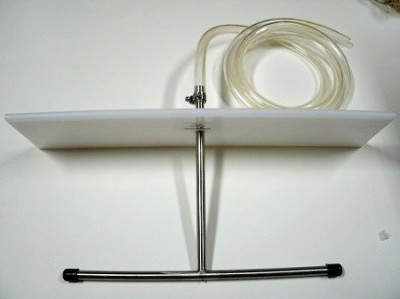
Sparge – This process is simply rinsing your mashed grains with hotter water (typically around 168F) in an effort to leave behind as little fermentable sugar as possible. This can be done by gently pouring water over the top of the grain bed as the mash tun slowly drains, a device called a sparge arm can be used to automate the process or, in brew in a bag situations (I’m not a big fan of this process, but it’s effective if you have space limitations) batch sparging where the entire batch is dunked in clean water like a tea bag.
Before starting the sparge I typically gather the first gallon or so from the mash and pour it back into the tun as it tends to have a fair amount of particles from the grain. Normally you don’t want to disturb the grain bed during the sparge. Allow your mash tun to slowly drain into your brew kettle while gently adding your sparge water over the top. Try to maintain an inch or so of liquid on top of the grain bed to help maintain temp. Continue running until you’ve reached your desired volume (your full final volume plus whatever you expect to boil off). The transfer into your boil kettle and sparge should take about 20-30 minutes for a 5-gallon batch.
Brew In A Bag (BIAB) – Pretty much what it sounds like… your mash is contained within a food safe bag (paint strainers work great). Much like brewing a big pot of tea. As I mentioned above, I’m not a huge fan of this particular process, but for some it’s the only option either because of kettle size constraints or space in general.
Efficiency - Your efficiency is a measurement of how effectively your equipment and process are at extracting the potential fermentable sugars from the grains. Around 70-75% tends to be pretty average. Efficiency will vary slightly based on the amount of grain used and the size of the mash tun (as well as the surface area of the mash). Larger grain bills will typically result in lower efficiency.
Step By Step:
Step 1) Select your grain bill. Unlike your previous extract brews, you’ll need to include (usually) 60-100% base male. The most common base malt is Pale Malt (2-row). Base malts contain the enzymes necessary to break down the complex carbohydrates from your entire grain bill into fermentable sugars.
There are many other base malts to choose from depending on your desired flavor. I’ll cover these as well as many of the specialty grains available to you in a later article.
Step 2) Mill the grains. The goal here is to have as many of the grain husks cracked open as possible without creating flour. While a fine mill may result in a higher efficiency, it’s not all about having the most efficient brew – it’s about having a tasty brew. Additionally, over-milling can result in a doughy mash which, in turn, can become a stuck (clogged) mash/sparge. Most commercial breweries aim for under 80% efficiency (while they could certainly get close to 100) because beyond that you may start extracting undesired flavors.
Step 3) Calculate the volume and temperature of your strike water (mash water). You’re aiming for somewhere between 140-168F in your final mash temp, though likely not either extreme. For a basic ale, lets assume a mash temp of 148F-154. Remember, the temperature of your grain as well as the internal temperature of your mash tun will cause a reduction in the temperature of the strike water. There are several tools available to help calculate this (I use BeerSmith).
Your volume of strike water should be about 1.25 quarts of water per pound of grain. I like 1.25 because it allows me room to make adjustments by adding either boiling or cold water to hit my target mash temp precisely.
Your 2-row is happiest in a pH of around 5.2. It is this pH that activates the debranching enzymes which you need to break down the complex carbohydrates to fermentable sugars. If you want non-alcoholic grain drink feel free to ignore this… seriously though, I’ve never needed to make a water adjustments to get to my pH nor do I bother testing the pH. The grains do a pretty good job of getting within the 5.2 range all by themselves unless your water is really basic (alkaline).
There is a product on the market called 5.2 which (through magic, I can only assume) claims to stabilize mash water at a consistent… you guessed it – 5.2 pH. I’ve never experimented with it myself and there seem to be mixed reviews.
Another option if you’re water is too basic (meaning the pH is too high) would be a small addition of acidulated malt to your grain bill.
Step 4) Mash in. Infuse your strike water into your grains in your mash tun. Make sure it is well mixed and take a temperature reading. If your temp is low you can add a little boiling water to increase it. If it’s high, add a little cold water to reduce it. Mash times can vary, but 75 minutes seems to be generally accepted for most brews. A taste of the mash now vs. 75 minutes from now should be very different. It should taste like liquid bread now, but will turn extremely sweet once conversion has completed.
Step 5) Prepare your sparge water. The most common temp for sparge water is around 168F. You don’t want to go much higher or you’ll start to extract unwanted tannins from the grain husks. Remember you’re going to have some thermal loss when you transfer your water into your HLT (sparge tank). I usually heat my sparge water to around 178F. You will learn what works best for your specific equipment given a little experience. Adjustments can always be made with boiling or cold water.
Step 6) Once conversion is complete you can begin your sparge. Run out the first gallon or so of the wort and gently pour it back into the mash tun. Once the wort pours mostly clear you can allow it to slowly drain into your boil kettle.
Whether manually infusing your sparge water through a hose or gently pouring it over the top of the grain bed or using a sparge arm to automate the process, the goal is to leave the grain bed undisturbed and maintain a thermal blanket by keeping an inch or so of water on top of the bed. The grain bed will actually act as a filter and help keep particles out of your kettle. Continue this process until you’ve collected enough wort to compensate for trub loss and boil-off.
Step 7) Begin your boil. That’s it! Now it’s business as usual except you won’t have to worry about extract additions (unless your recipe calls for them).
So to dumb the whole process down, you will be steeping (mashing) grains for about an hour, rinsing them (sparging) and then starting your boil as normal. Not so scary, huh?
There are loads of do-it-yourself videos on the web for virtually all the equipment you’ll need. Here is a list of what you’ll need to either build or purchase:
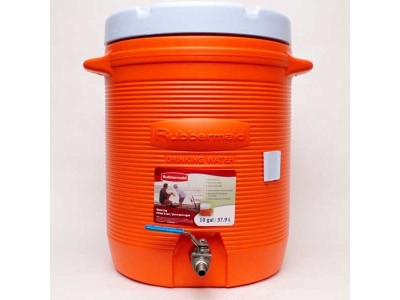
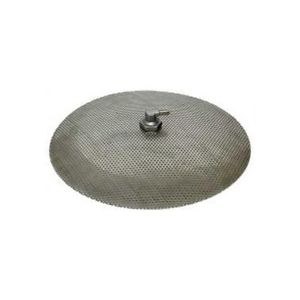
Mash Tun – Usually a cooler (often 10-gallon Home Depot water coolers, though I’ve converted larger, rectangular coolers as well) fitted with a ball valve and either a false bottom or stainless steel filter to keep the grain junk out of your wort.
HLT / Sparge Tank – This can be either another cooler with ball valve (no filter necessary) or a second kettle.
Sparge Arm (optional) – A sparge arm slowly and automatically spritzes your sparge water over the top of your grain bed. You can do this manually, but you’ll need to be gentle and expect to spend some time standing over your steamy mash tun.
Thermometer – I’m pretty sure you know what this does. One thing to keep in mind as you heat your strike and sparge water is that the temperature of your HLT & Mash Tun as well as your dry grains will absorb some heat causing it to drop in temp. I find that BeerSmith is relatively accurate at calculating and compensating for this heat loss.
Thanks for reading! I hope this took some of the mysticism out of all grain brewing. Please let me know if I missed anything or if I can give further clarification. Until next time!
Next Article: “Converting All-Grain to Extract”
—————————————————————————————————


No Responses to “How To: Going All Grain”